

Copyright@Gary P. Thaller 2011 Copies may be made for individual use. All recipes are original.
Saturday, February 18, 2012
Wednesday, February 15, 2012


Monday, February 6, 2012
Gridding a Map
Using Tope Explorer! Colorado, overlay UTM grid lines. The program gives an option for size. I use 154 meters which is 500 feet on a 1:24,000 scale. Those that prefer tenths of a mile use 161 meters.
Then copy this map into Excel.
 Draw lines along the grid lines and then delete the map. After that, group the lines. This process only has to be done once if you save the file and always use the same scale.
Rotate the gridlines the amount of variation. In this case, 8 degrees.
Then import the map without gridlines. Send the picture to the back and slide it so crossing lines are at the start.

Now you don't have to deal with variation because I have an easy to orient MN overlay.
Then copy this map into Excel.

Rotate the gridlines the amount of variation. In this case, 8 degrees.
Then import the map without gridlines. Send the picture to the back and slide it so crossing lines are at the start.

Now you don't have to deal with variation because I have an easy to orient MN overlay.
Friday, February 3, 2012
Hiking Naked
Warning: This is a very advanced method. I estimate it would
take about 1,000 miles of dedicated practice to get to this level and proof of
proficiency in simpler trials to try it.
A pre-planned hike would look something like this. It starts
in the southeast and ends in the northwest about a mile away in a straight
line. The distance traveled on the trail is about 3 miles. Most would start out
at a trailhead and not even bring a map with them. They would just follow the
trail and get there.

Let’s start stripping things away and see what happens.
First take away the trail. The one in the previous picture was just one I drew
and wasn’t really there.

So let us take that away and leave just a destination of
305 MH/6091’ from the current location.
How many would accept
this challenge with just a compass? How many would get lost trying? Those that
try will likely try the traditional method of connecting each vector of travel
to the previous one and making them end up at the destination. Yeah, try that
when it’s raining and windy. Even in perfect conditions, it would take a long
time.
The first simplification is to translate the information into two usable numbers. The distance north is a positive number and west
is negative.
Use the following table to determine this:

Look for 305. Since there is no column for 6,091, take the
columns for 100 and multiply by 60.91.(You probably have a calculator on your
cell phone.)
57 x 60.91 = 3,495’ N
82 x 60.91 = -4,989’ W
Now all you have to do is meander in the direction the
terrain lets you. Keep track of the distances traveled along the N/S line and
E/W line and you can get there. To do that takes some organization and a table
to help you out in the early learning stages.
The organization comes from this table:

Each 100 to
180 feet, log the time, the MH for the last vector and the distance taken from
the table below. Enter this data in the leg box and add it to the previous
total to get your position. Record any notes that are interesting. Water sources
are critical in case you need to come back to it. Things that can orient you on
the way back are also important.
Use the
table below to get the data.

Thursday, February 2, 2012
Navigating Without a Map
Warning: This is a overview of a method which takes a great deal of time and effort to learn. Wandering off the trail in a difficult area using this method literally takes 100's of miles of practice before attempting it. It's just posted here so some experienced people can review it for clarity.
Yesterday, I decided to do a difficult test of navigating without a map. The goal was to wander around in various directions for about a half mile taking the paths of low resistance. I did avoid the little trails and roads that were there. Along the way, I recorded only compass bearings and distances walked on thos bearings. I made no records of landmarks that could help me find my way back. At the end of 23 legs, I left an Altoid can with $10 in it under the edge of a bush. Then I walked out a different direction, again not looking for any landmarks to help me find it. Today, I went back to find the can by a more direct route which I calculated after I got home. At the end of the direct route, I was 14 feet from the can which I found immediately.
Here is the area. Notice, it's covered with non-descript tumbleweed and other bushes. There is no direct route through it. It's difficult to walk in one direction more than about 120 feet.

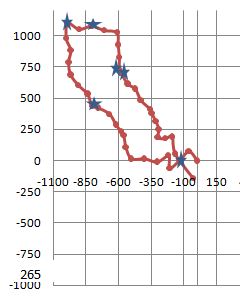
After I got home, I drew a map of the course using a compass on the paper. I didn't use a protractor.
 This is a conventonal method of resolving this problem. The only problem is, out in the field you need a flat surface where you can tape the paper down so it doesn't move. It also takes a long time to do accurately. Even then, it isn't accurate enough to find an Altoid can left in the brush. This one is off by a little bit. Probably because of some influence on the compass by metal in my kitchen table. Or perhaps the flashlight I was using to see the numbers better. The dashed line is the direct vector to where I left the can which would be impossible to walk directly because of dense brush.
 On each leg, I calculated the vertical and horizontal distance I traveled. I picked my bearings to make them work out to my target distances. Nothing fancy. Just WAG's along the way. And going where the brush let me.

Yesterday, I decided to do a difficult test of navigating without a map. The goal was to wander around in various directions for about a half mile taking the paths of low resistance. I did avoid the little trails and roads that were there. Along the way, I recorded only compass bearings and distances walked on thos bearings. I made no records of landmarks that could help me find my way back. At the end of 23 legs, I left an Altoid can with $10 in it under the edge of a bush. Then I walked out a different direction, again not looking for any landmarks to help me find it. Today, I went back to find the can by a more direct route which I calculated after I got home. At the end of the direct route, I was 14 feet from the can which I found immediately.
Here is the area. Notice, it's covered with non-descript tumbleweed and other bushes. There is no direct route through it. It's difficult to walk in one direction more than about 120 feet.

First I went of to the right to get in the brush and make pacing difficult. Then I circled to the left behind the trees. Then back to the right and out. Then back in. The total walking distance was about 2,500 feet. Later I calculated my distance from the start to be 807 feet north and 87 feet west. I did not use a GPS at all. Just a compass and paper to log the
information.
After I got home, I drew a map of the course using a compass on the paper. I didn't use a protractor.
 This is a conventonal method of resolving this problem. The only problem is, out in the field you need a flat surface where you can tape the paper down so it doesn't move. It also takes a long time to do accurately. Even then, it isn't accurate enough to find an Altoid can left in the brush. This one is off by a little bit. Probably because of some influence on the compass by metal in my kitchen table. Or perhaps the flashlight I was using to see the numbers better. The dashed line is the direct vector to where I left the can which would be impossible to walk directly because of dense brush.
Here are the tables I used to determine where I went yesterday an how to get back today. First the tracking form which is filled out for the return:
 On each leg, I calculated the vertical and horizontal distance I traveled. I picked my bearings to make them work out to my target distances. Nothing fancy. Just WAG's along the way. And going where the brush let me.
I got the horizontal and vertical distances from the table below which I made using knowledge of trig.It looks complex, but it only takes a few seconds for each leg to extract the data.

Subscribe to:
Posts (Atom)