Monday, February 6, 2012

Gridding a Map

Using Tope Explorer! Colorado, overlay UTM grid lines. The program gives an option for size. I use 154 meters which is 500 feet on a 1:24,000 scale. Those that prefer tenths of a mile use 161 meters.

Then copy this map into Excel.

 Draw lines along the grid lines and then delete the map. After that,  group the lines. This process only has to be done once if you save the file and always use the same scale.

Rotate the gridlines the amount of variation. In this case, 8 degrees.

Then import the map without gridlines. Send the picture to the back and slide it so crossing lines are at the start.

Now you don't have to deal with variation because I have an easy to orient MN overlay.

Friday, February 3, 2012

Hiking Naked


Warning: This is a very advanced method. I estimate it would take about 1,000 miles of dedicated practice to get to this level and proof of proficiency in simpler trials to try it.

A pre-planned hike would look something like this. It starts in the southeast and ends in the northwest about a mile away in a straight line. The distance traveled on the trail is about 3 miles. Most would start out at a trailhead and not even bring a map with them. They would just follow the trail and get there.


Let’s start stripping things away and see what happens. First take away the trail. The one in the previous picture was just one I drew and wasn’t really there.
A lot of people could still figure it out because they have a map and a vector to the destination. They can just follow the terrain features and stay pretty oriented with the help of a compass.

So let us take that away and leave just a destination of 305 MH/6091’ from the current location.

 How many would accept this challenge with just a compass? How many would get lost trying? Those that try will likely try the traditional method of connecting each vector of travel to the previous one and making them end up at the destination. Yeah, try that when it’s raining and windy. Even in perfect conditions, it would take a long time.

The first simplification is to translate the information  into two usable numbers. The distance north is a positive number and west is negative.

Use the following table to determine this:

Look for 305. Since there is no column for 6,091, take the columns for 100 and multiply by 60.91.(You probably have a calculator on your cell phone.)

57 x 60.91 = 3,495’ N   

82 x 60.91 = -4,989’ W

Now all you have to do is meander in the direction the terrain lets you. Keep track of the distances traveled along the N/S line and E/W line and you can get there. To do that takes some organization and a table to help you out in the early learning stages.

The organization comes from this table:


Each 100 to 180 feet, log the time, the MH for the last vector and the distance taken from the table below. Enter this data in the leg box and add it to the previous total to get your position. Record any notes that are interesting. Water sources are critical in case you need to come back to it. Things that can orient you on the way back are also important.

Use the table below to get the data.


Follow contour

Thursday, February 2, 2012

Navigating Without a Map

Warning: This is a overview of a method which takes a great deal of time and effort to learn. Wandering off the trail in a difficult area using this method literally takes 100's of miles of practice before attempting it. It's just posted here so some experienced people can review it for clarity.

Yesterday, I decided to do a difficult test of navigating without a map. The goal was to wander around in various directions for about a half mile taking the paths of low resistance. I did avoid the little trails and roads that were there. Along the way, I recorded only compass bearings and distances walked on thos bearings. I made no records of landmarks that could help me find my way back. At the end of 23 legs, I left an Altoid can with $10 in it under the edge of a bush. Then I walked out a different direction, again not looking for any landmarks to help me find it. Today, I went back to find the can by a more direct route which I calculated after I got home. At the end of the direct route, I was 14 feet from the can which I found immediately.

Here is the area. Notice, it's covered with non-descript tumbleweed and other bushes. There is no direct route through it. It's difficult to walk in one direction more than about 120 feet.

 First I went of to the right to get in the brush and make pacing difficult. Then I circled to the left behind the trees. Then back to the right and out. Then back in. The total walking distance was about 2,500 feet. Later I calculated my distance from the start to be 807 feet north and 87 feet west. I did not use a GPS at all. Just a compass and paper to log the
information.


After I got home, I drew a map of the course using a compass on the paper. I didn't use a protractor.

This is a conventonal method of resolving this problem. The only problem is, out in the field you need a flat surface where you can tape the paper down so it doesn't move. It also takes a long time to do accurately. Even then, it isn't accurate enough to find an Altoid can left in the brush. This one is off by a little bit. Probably because of some influence on the compass by metal in my kitchen table. Or perhaps the flashlight I was using to see the numbers better.  The dashed line is the direct vector to where I left the can which would be impossible to walk directly because of dense brush.
Here are the tables I used to determine where I went yesterday an how to get back today. First the tracking form which is filled out for the return:
On each leg, I calculated the vertical and horizontal distance I traveled. I picked my bearings to make them work out to my target distances. Nothing fancy. Just WAG's along the way. And going where the brush let me.

I got the horizontal and vertical distances from the table below which I made using knowledge of trig.It looks complex, but it only takes a few seconds for each leg to extract the data.


Tracking sheet

Magic Table

Sunday, January 22, 2012

Ranger beads

These beads are used for counting paces. Start with all the beads on top. (There are 9 on top and 4 on the bottom.) Start walking with the left foot and every other time the right foot strikes, slide a yellow bead down. When there are no yellow beads left, the next time, slide the yellow beads up and an orange bead down.

Each count would be 4 times your pace for 1 step. In my case, it's 10 feet.

So this picture shows I've gone 230 paces or 230 feet.

Each person will have to calibrate them with a known distance.


Here is a great video on making them. There are a couple tricks, so it's worth watching.

Friday, January 13, 2012

Handy Ruler

Light pole solution


Recall the original task was to find the bearing and range between two poles at a distance without going more than 50 feet from the  pole in the lower left.

So, I made a special 4 circle protractor which would be centered on the home pole and aligned on the cardinal directions. The center of each protractor is a scaled 50 feet from the home pole. Then I'd take 5 bearings to both P1 and P2. one from each protractor. This should locate the position of P1 and P2 very accurately. Then it's a simple matter of drawing a courseline between the two poles. Laying a protractor on one to determine the bearing and measuring the distance.

This sort of exercise is not without practical use. I've decided to make a clear protractor for 1:24000 maps with a diameter of 1 mile. It can be printed on frosted clear plastic you can write on. Marks could be made with a pencil to orient the protractor so magnetic headings can be read directly from the protractor.

Thursday, January 12, 2012

Light pole brain teaser

You are in a parking lot with poles oriented something like this. It's a freehand drawing, so measurements are not accurate. You have 50 feet of parachute line plus enough to tie it to the pole.

Using a compass and the parachute line, draw the azimuth lines and distances shown.

Do not go outside the 50 foot circle.

(This is a tough one.)

Time limit: 1 hour.

Accuracy:

No more than 8 feet error on any distance or 5 degree error on any bearing.

.
To solve it, I used this diagram. The vetical scales and horizontal scales are not the same wideth. Just a problem with Exel I'll work on.


Wednesday, January 11, 2012

GPS for Dead Reckoning Navigation

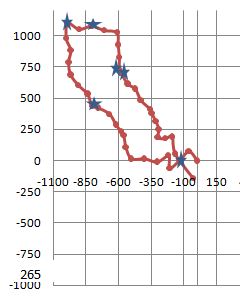
You hiked from the south to the hilltop in the SW corner. You want to make your way bushwacking to the camp in the NW corner. You have no waypoints in the GPS. The "trail" was drawn by me. There is no existing trail.


The following method is just the way I would do it. There probably other better ways. All the waypoints could be entered at the start, but I feel the chances of doing that without an error are small.

Rather than going in a direction until encountering an obstacle, I feel it is better to preplan a route before starting.

The first step would be to draw an azimuth (straight line) to the Camp. Since I can't walk on water, that obviously isn't going to work. There is no reason to measure the azimuth.

So, I started by drawing a "trail." I try to make it along contour lines as much as possible and to change altitude where the contour lines are furthest  apart. I also have an eye for terrain features I could orient myself with along the way. Sometimes it was just to get a nice view.

After drawing the trail, I put a tick mark every 1/10 mile. The next step is to make a list of bearings and distances. Don't forget to adjust for variation. Since doing this exercise, I've decided a protractor is part of my essential equipment. It could be done with just a compass, but it is very difficult.

Personally, I would write down all the bearings and distances before starting on the trail. As I get to each one, I'd mark it on the map and check it on the list.

I've added an extra column for 180 degrees out from the MH to use with the GPS in the next step. To prevent errors, it's probably worth taking the time to compute and write these down before starting..

Set up your trip summary screen so you can see the distance and bearing to the waypoint you are navigating to.

Mark the start as a waypoint and select 'goto" the start. (Point 1 in this example.) I know, you are already there. Then use your compass to site on something in a distance using the MH to the next waypoint.  Head in that direction. Be sure to check for reasonableness so you don't go 180 out. The first heading is 92.72.

As you walk, check your summary screen  for the bearing and distance to the start (point 1 in this example) adjusting as necessary. The bearing you are trying to maintain is the reciprocal of the MH to the next point.

When you get the next waypoint, stop. Using 002 as an example, your bearing will be 272.22 and the dist 0.1 miles to waypoint 1. Mark that as a waypoint and do it again.

This takes practice. It can be practiced anywhere using shorter distances.

Once you get proficient doing it with a GPS, you can practice with just a compass and pacing using terrain features to assist in orientation along the way, this sort of navigation can be very accurate. Until it's practiced once or twice, it seems very confusing. After, it's real simple.

Now, let's see how the trail routing was. The video motion is in steps, so the video appears to stop and start.