Warning: This is a very advanced method. I estimate it would
take about 1,000 miles of dedicated practice to get to this level and proof of
proficiency in simpler trials to try it.
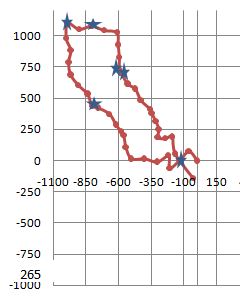
A pre-planned hike would look something like this. It starts
in the southeast and ends in the northwest about a mile away in a straight
line. The distance traveled on the trail is about 3 miles. Most would start out
at a trailhead and not even bring a map with them. They would just follow the
trail and get there.
Let’s start stripping things away and see what happens.
First take away the trail. The one in the previous picture was just one I drew
and wasn’t really there.
A lot of people could still figure it out because they have
a map and a vector to the destination. They can just follow the terrain
features and stay pretty oriented with the help of a compass.
So let us take that away and leave just a destination of
305 MH/6091’ from the current location.
How many would accept
this challenge with just a compass? How many would get lost trying? Those that
try will likely try the traditional method of connecting each vector of travel
to the previous one and making them end up at the destination. Yeah, try that
when it’s raining and windy. Even in perfect conditions, it would take a long
time.
The first simplification is to translate the information into two usable numbers. The distance north is a positive number and west
is negative.
Use the following table to determine this:
Look for 305. Since there is no column for 6,091, take the
columns for 100 and multiply by 60.91.(You probably have a calculator on your
cell phone.)
57 x 60.91 = 3,495’ N
82 x 60.91 = -4,989’ W
Now all you have to do is meander in the direction the
terrain lets you. Keep track of the distances traveled along the N/S line and
E/W line and you can get there. To do that takes some organization and a table
to help you out in the early learning stages.
The organization comes from this table:
Each 100 to
180 feet, log the time, the MH for the last vector and the distance taken from
the table below. Enter this data in the leg box and add it to the previous
total to get your position. Record any notes that are interesting. Water sources
are critical in case you need to come back to it. Things that can orient you on
the way back are also important.
Use the
table below to get the data.